

why make this recipe
Ladybug Chocolate Covered Oreos are cute, delicious, and perfect for any occasion. Whether it’s a kid’s birthday party, a family gathering, or just a fun treat for yourself, these delightful cookies are sure to bring a smile to everyone’s face. They combine the classic taste of Oreos with colorful chocolate designs, making them a great craft and snack in one!
how to make Ladybug Chocolate Covered Oreos
Ingredients :
- 18 to 20 Oreo cookies
- 10 oz milk chocolate melts
- 10 oz white chocolate melts
- 1 tbsp vegetable oil
- Red food coloring
- Edible eyes
Directions :
- Line two baking sheets with parchment paper.
- In a microwave-safe bowl, melt your milk chocolate melts with the vegetable oil. Go slow—30 seconds at a time, stirring in between—until it’s nice and smooth.
- Dip 12 Oreo cookies into the melted milk chocolate, coating them completely. Gently tap off the excess chocolate.
- Place the coated cookies on one of your prepared baking sheets and pop them in the fridge to set for about 10 minutes.
- Carefully separate the remaining Oreo cookies and cut each side in half. These halves will become the ladybug wings! Use a gentle sawing motion with a sharp knife for best results.
- Melt the white chocolate the same way as before. Once it’s smooth, add red food coloring a little at a time until you get a bright red color.
- Dip the Oreo halves into the red chocolate, covering both sides, and place them on the second baking sheet. Freeze for 10–15 minutes until they’re firm.
- Once the red wings are hardened, dip the flat side in milk chocolate and attach them to the tops of your milk chocolate-covered cookies.
- Dip your edible eyes in a tiny bit of melted chocolate and stick them on near the top of each cookie.
- Use a cake pop stick, the end of a spoon, or a skewer to dot on the ladybug spots with the remaining milk chocolate.
- Pop the finished cookies back in the fridge for another 10 minutes to fully set.
how to serve Ladybug Chocolate Covered Oreos
These adorable cookies are perfect for serving at parties or as a fun dessert at home. Arrange them on a colorful platter or cake stand to showcase their charm. You can also pack them in treat bags for a sweet party favor or gift.
how to store Ladybug Chocolate Covered Oreos
To keep your Ladybug Chocolate Covered Oreos fresh, store them in an airtight container at room temperature. They can last for about a week, or you can keep them in the fridge for a longer shelf life. Just make sure to bring them to room temperature before serving for the best taste!
tips to make Ladybug Chocolate Covered Oreos
- Use a good quality chocolate melt for better taste and smoother texture.
- For an easier cutting process, chill the Oreo cookies briefly before slicing them for wings.
- Experiment with different colors of food coloring to create variations of your ladybugs.
variation
You can add a sprinkle of colorful edible glitter on top or use different colors for the spots to create a rainbow of ladybugs. You might also try variations with different flavors of Oreos, like mint or peanut butter.
FAQs
Can I use dark chocolate instead of milk chocolate?
Yes, dark chocolate can be used if you prefer a richer flavor!How do I make the wings more colorful?
You can use different colors of candy melts or food coloring to change the color of the wings.What if I don’t have edible eyes?
You can use small chocolate chips or even draw eyes with melted chocolate on the cookies.
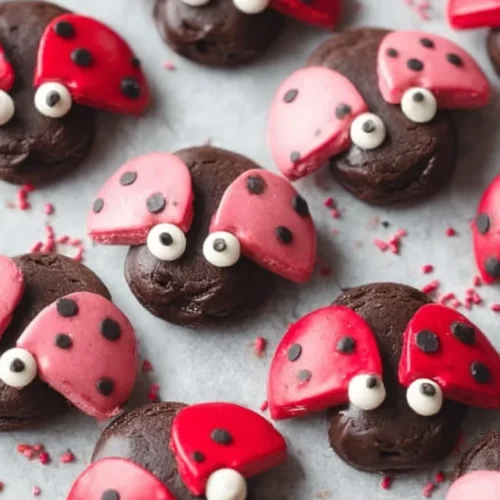
Ladybug Chocolate Covered Oreos
Ingredients
Main Ingredients
- 18-20 pieces Oreo cookies
- 10 oz milk chocolate melts Use good quality for better taste
- 10 oz white chocolate melts
- 1 tbsp vegetable oil Helps in melting chocolate smoothly
- to taste red food coloring For coloring white chocolate
- as needed edible eyes
Instructions
Preparation
- Line two baking sheets with parchment paper.
- In a microwave-safe bowl, melt the milk chocolate melts with the vegetable oil. Microwave in 30-second intervals, stirring in between, until smooth.
- Dip 12 Oreo cookies into the melted milk chocolate, coating them completely. Gently tap off the excess chocolate.
- Place the coated cookies on one of the prepared baking sheets and refrigerate for about 10 minutes to set.
- Carefully separate the remaining Oreo cookies and cut each cookie in half to create wings.
- Melt the white chocolate similarly, then add red food coloring until you achieve a bright red color.
- Dip the Oreo halves into the red chocolate, covering both sides, and place them on the second baking sheet. Freeze for 10-15 minutes until firm.
- Once the red wings are hardened, dip the flat side in the milk chocolate and attach them to the tops of the milk chocolate-covered cookies.
- Dip the edible eyes in a little melted chocolate and attach them to the top of each cookie.
- Use a cake pop stick or skewer to dot on ladybug spots with remaining milk chocolate.
- Refrigerate the finished cookies for another 10 minutes to fully set.

